 The wind has turned Southerly. That might not be relevant for most RepRapers out there, but it is for paragliding pilots. When there's no paragliding, other activities come to the fore!
After much software fiddling, in particular installing the package several times on Ubuntu to get the optional buttons to appear, (Note: it's important to check in which directory the program gets started, as it creates a .pronsolerc in the Home directory, which, if you forget to delete it, makes the buttons not appear), I managed to get the software to run, and activate all the functions on the printer.
At first, a few of the motors wouldn't move. I double-checked the current limit values (400mV on all drivers, and I set the Z to 800mV, as there are two motors). Nothing amiss there. I powered off, moved them by hand to check that there was no mechanical snag, nothing wrong there either.
After powering on again, everything went fine! This type of troubleshooting is very unsettling to me. How am I going to fix it next time if I don't know what I did to fix it this time?
I measured the temperature wherever I could stick the thermocouple probe and compared the readings from my hand-held meter with the values displayed on the computer screen. Not bad. There are at most a few degrees deviation, and that can easily be explained by the difficulty in holding the mobile probe on the right spot, the poor thermal contact, and the cooling effect the probe has on the small part (on the hot end in particular).
The pyrometer gave me a reading of the bed surface that was in agreement with the hand-held thermocouple, and a few degrees lower than the computer reading. That also ties in.
Next, I measured the feeding of the filament. For a 10mm Extrude command, 11.5mm of filament is pushed in. I had reservations about the strength of the extruder motor, but after the little testing I have done, I fully trust that the hobbled shaft is able to push the filament (and pull it from the spool) without problem.
Next step is the calibration, and setting the parameters to have as good a print finish as possible...
Oh, and the printer got a name: Bertie. It's going to free me from having to purchase plastic parts that don't serve my purpose 100%, it's Huxley-Bertie.
The wind has turned Southerly. That might not be relevant for most RepRapers out there, but it is for paragliding pilots. When there's no paragliding, other activities come to the fore!
After much software fiddling, in particular installing the package several times on Ubuntu to get the optional buttons to appear, (Note: it's important to check in which directory the program gets started, as it creates a .pronsolerc in the Home directory, which, if you forget to delete it, makes the buttons not appear), I managed to get the software to run, and activate all the functions on the printer.
At first, a few of the motors wouldn't move. I double-checked the current limit values (400mV on all drivers, and I set the Z to 800mV, as there are two motors). Nothing amiss there. I powered off, moved them by hand to check that there was no mechanical snag, nothing wrong there either.
After powering on again, everything went fine! This type of troubleshooting is very unsettling to me. How am I going to fix it next time if I don't know what I did to fix it this time?
I measured the temperature wherever I could stick the thermocouple probe and compared the readings from my hand-held meter with the values displayed on the computer screen. Not bad. There are at most a few degrees deviation, and that can easily be explained by the difficulty in holding the mobile probe on the right spot, the poor thermal contact, and the cooling effect the probe has on the small part (on the hot end in particular).
The pyrometer gave me a reading of the bed surface that was in agreement with the hand-held thermocouple, and a few degrees lower than the computer reading. That also ties in.
Next, I measured the feeding of the filament. For a 10mm Extrude command, 11.5mm of filament is pushed in. I had reservations about the strength of the extruder motor, but after the little testing I have done, I fully trust that the hobbled shaft is able to push the filament (and pull it from the spool) without problem.
Next step is the calibration, and setting the parameters to have as good a print finish as possible...
Oh, and the printer got a name: Bertie. It's going to free me from having to purchase plastic parts that don't serve my purpose 100%, it's Huxley-Bertie.
Saturday, September 10, 2011
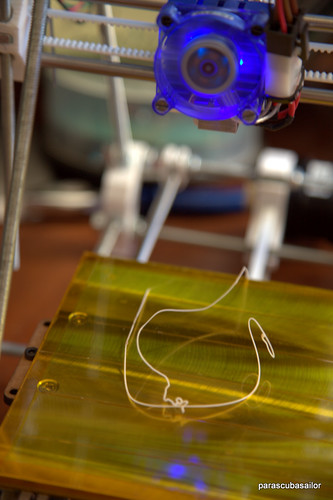
First extrusion
Yay!
Need I say more?
The wind has turned Southerly. That might not be relevant for most RepRapers out there, but it is for paragliding pilots. When there's no paragliding, other activities come to the fore!
After much software fiddling, in particular installing the package several times on Ubuntu to get the optional buttons to appear, (Note: it's important to check in which directory the program gets started, as it creates a .pronsolerc in the Home directory, which, if you forget to delete it, makes the buttons not appear), I managed to get the software to run, and activate all the functions on the printer.
At first, a few of the motors wouldn't move. I double-checked the current limit values (400mV on all drivers, and I set the Z to 800mV, as there are two motors). Nothing amiss there. I powered off, moved them by hand to check that there was no mechanical snag, nothing wrong there either.
After powering on again, everything went fine! This type of troubleshooting is very unsettling to me. How am I going to fix it next time if I don't know what I did to fix it this time?
I measured the temperature wherever I could stick the thermocouple probe and compared the readings from my hand-held meter with the values displayed on the computer screen. Not bad. There are at most a few degrees deviation, and that can easily be explained by the difficulty in holding the mobile probe on the right spot, the poor thermal contact, and the cooling effect the probe has on the small part (on the hot end in particular).
The pyrometer gave me a reading of the bed surface that was in agreement with the hand-held thermocouple, and a few degrees lower than the computer reading. That also ties in.
Next, I measured the feeding of the filament. For a 10mm Extrude command, 11.5mm of filament is pushed in. I had reservations about the strength of the extruder motor, but after the little testing I have done, I fully trust that the hobbled shaft is able to push the filament (and pull it from the spool) without problem.
Next step is the calibration, and setting the parameters to have as good a print finish as possible...
Oh, and the printer got a name: Bertie. It's going to free me from having to purchase plastic parts that don't serve my purpose 100%, it's Huxley-Bertie.
Subscribe to:
Post Comments (Atom)
No comments:
Post a Comment